Thursday, 24 September 2020

Marlin 1.1.9 - Bed Levelling on a Heated Bed


Heated Bed - Bed Levelling 

A few days back, I was wondering if it mattered much if I did a bed leveling without heating the bed to 110C. Well, I thought it was OK when I printed the "X" sample (45 x 3 x 1.5 mm), as shown below. It looked great then.


I should have known that it was meant to be a "first-cut" to prove that the auto calibration and initial bed levelling worked. But, it should not be taken as a fuller test since the print subject was rather small.

Here is a short video of what happened when I did a larger print (100 x 100 x 2mm) after doing a new bed levelling WITHOUT first heating the bed.


You can see that a few portions, including the 100 x 100mm perimeter (this facing side) were not printed. At the other end, except for the triangle shaped hole, all seemed somewhat fine. So, I terminated the print, cleaned the bed and did a Bed Levelling again, after heating the bed to 110C.

The bed's thermistor read 110C and displayed the same figure on the printer's LCD. A fish-tank temperature probe that I inserted somewhat nearer to the center of the bed (below the heated aluminum plate) showed about 100C.

I don't know who to trust anymore.


Here is a photo of the same plate that was printed after Bed Levelling was done with a heated bed. Unfortunately, I did not record a video.


Ignoring the trailing filament that I did not clear up before printing, the general outcome is very good. I stopped the printing altogether as I realized that I had forgotten to coat the glass bed with my sugar/flour paste! It will take me a very long hard time to remove this print from the glass!!

So, in conclusion - at least for my Kossel, Bed Levelling must be done with a heated bed (if you are using a bed that needs to be heated). Oh yes, please remember to save your settings after performing the Bed Levelling.

For Marlin 1.1.9, Bed Levelling:

1.    Pre-heat your bed to required temperature

2.    Prepare >Bed Levelling >Level Bed  (it will take a short while)

3.    Prepare >Bed Levelling > Store Settings (so that after re-boot the settings are still there).

4.    Print all that you want!

Permanent Link: https://macro-passion.blogspot.com/2020/09/marlin-119-bed-levelling-on-heated-bed.html


Sunday, 20 September 2020

Delta Auto Calibration - Marlin 1.1.9 Upgrade

Catching Up With My Kossel Pulley

I realized that I have not been doing any update on my macro photography stuff for quite a while! In the first place, I should not have used "Macro-Passion".  Maybe, "Anything Can" is a better blog name so that I can write whatever topic I want. 

In fact, this time round I would like to touch on some of my experiences on the 3D Anycubic Kossel Pulley printer that I bought in 2017.

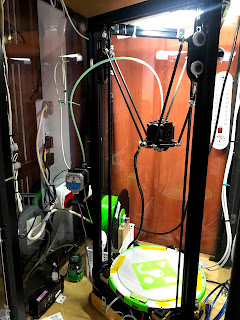
Here is a picture of the lanky printer. That green ABS filament spool you see on the left was bought at the same time as the printer. For a long while, I did not "humid-protect" it and hope that it will last well.


This affordable printer is a gem, considering that it is totally upgradable - which I did not do much on, until last week or so. I did change some wheels though and created a bearing-supported filament holder for the poor reel. I never regretted buying this printer.

Past two days, I was trying to move away from the 2018 .hex firmware that Anycubic support provides as a download. This firmware allows users to perform auto-levelling with a sensor probe. I have been using this version for about two years, on and off. But, I needed to make some changes at the source level. Too bad.

Auto Calibration - Marlin 1.1.9

So, I decided to search the trusty YouTube (again) and found Chris Ridley's video. It was easy to follow and I managed to download the firmware, change some parameters and perform the firmware upgrade. You can check out Chris', Delta Auto Calibration - Marlin 1.1.9 - Chris's Basement video here.

Yes. In short, it worked and I successfully got the Kossel Pulley's firmware upgraded. More on this exciting process below.

Some Confusing Actions

As for the downloading of the Marlin 1.1.9, I tried three versions, including the 1.1.x "bugfix" snapshot, because someone pointed out that this BUGFIX fixes all the errors and adjusts some parameters.

For all three versions, I encountered the same "endstop" error - where the home position is about 46mm below the actual home position.

Finally, I contacted Chris at his YouTube comment and surprisingly, got an answer within the hour. Well, you could say, minutes! I just needed to disable DELTA_HOME_TO_SAFE_ZONE. Yes. Just that and it worked.

Selecting The Right Version of Marlin

Eventually, I decided to use the BUGFIX version as I read that it resolves a few important issues. You may check this page that shows the differences between the version 1.1.x and bugfix-1.1.x (or try other comparisons) ==> https://github.com/MarlinFirmware/Marlin/compare/bugfix-1.1.x...1.1.x

Some slight differences are listed below:

1.    Someone says this, "The main difference I found is that 1.1.9 apparently has the hom speed settings too high. The config from 1.1-bugfix has corrected values. Also the bed size is corrected". This comment can be found here, https://www.reddit.com/r/ender3/comments/agolqg/which_version_of_marlin_to_flash_119_or_bugfix_11x/

2.    This portion of codes is different from Chris' screen shot and I suspect that it is okay to let it be as it seems to have what Chris has suggested.

// Mechanical endstop with COM to ground and NC to Signal uses "false" here (most common setup).
#define X_MIN_ENDSTOP_INVERTING false  // set to true to invert the logic of the endstop.
#define Y_MIN_ENDSTOP_INVERTING false  // set to true to invert the logic of the endstop.
#define Z_MIN_ENDSTOP_INVERTING (ANYCUBIC_PROBE_VERSION + 0 == 1) // V1 is NO, V2 is NC
#define X_MAX_ENDSTOP_INVERTING false  // set to true to invert the logic of the endstop.
#define Y_MAX_ENDSTOP_INVERTING false  // set to true to invert the logic of the endstop.
#define Z_MAX_ENDSTOP_INVERTING false  // set to true to invert the logic of the endstop.
#define Z_MIN_PROBE_ENDSTOP_INVERTING Z_MIN_ENDSTOP_INVERTING

3,    As I needed a 110C heated bed for my ABS printing, I added (+20C) to the existing Bed_Maxtemp field so that I can input or select 110C later on at the printer's LCD. If this is not set, the most you can get is 105C ==> #define BED_MAXTEMP 130 

4.    I made this change for Pre-Heat menu: #define PREHEAT_2_TEMP_BED        110

Did It Work this Time?

I made all the changes as per Chris' video, and uploaded the BUGFIX 1.1.x into the Kossel. Also, Chris' mentioning of doing M502 and then a M500 from the Prontoface is good cautiousness which I appreciated.

The >Delta Calibration >Auto Calibration works fine. I did it on a clean non-heated glass bed. This glass bed sits on top of the aluminum plate. The total number of iterations was [11]! A staggering 11! So, it really took a while of coffee-drinking to wait it out.

Pre-Check of Parameter Values via LCD: 
Height level: >Prepare >Delta Calibration >Delta Settings, and the height is +313.00
Z-Offset: >Control >Motion > Probe Z Offset and the height is -17.15

Making Adjustment to the calibrated figures:
I checked, and found the nozzle at bed level is at +0.50.
- This was done via Prepare >Move Axis >Move Z >Move 10mm & 1mm & 0.1mm
My Cura layer height setting for almost all print was +0.20, so I decided to go for a +0.10 adjustment.
Therefore, -17.15 less (0.50 and 0.10) = -16.55
Switched back to Marlin, Configuration.h and adjusted the Z-Probe_Offset_From_Extruder from -17.15 to -16.55
Uploaded the changes back into the Kossel.
Did a M502 and M500 with Prontoface.
Heated up the bed to 110C and did a simple first print.
The result?


Thank you, Chris Riley!


AFTERNOTES
1. FINALLY: As always, any time you load in new firmware, always do the following: 
2. Control
3. Initialize EEPROM
4. Restore Failsafe (or Load Factory Setting)
5. Store Settings
6. Reboot the printer (Power off / Power on)

Permanent Link: https://macro-passion.blogspot.com/2020/09/catching-up-with-my-3d-printer-i.html

Tuesday, 24 July 2018

Termite Infestation!

This afternoon, I got a text from my daughter that her boyfriend's sister's room had been infested by termites! Not surprisingly, without a pause, she asked if I would like to have some!

Of course, I never say "No" to this kind of request. Just to be on the safe side, I asked her to get a few more, plus the wood that they had been feeding on.

"It is going to be an exciting evening", I thought.

Yes, indeed. Here are some photos of the cute termites, both the Coptotermes gestroi soldiers as well as workers. The termites are about 3.0mm long. Do enjoy, if you like termites!

The little termites are busy fellows, as they explore their new facility. Thanks to the safe method of containing them, the termites arrived at my home in good health.


Here, a worker (creamy-white) is seen "kissing" a fellow soldier. Actually, not. It is trying to move to the right when the soldier termite makes a left turn. When you are looking through a macro lens, you tend to see them as individuals, rather than a mass of termites.


The container that I used to keep them toppled over and some died as a result. I also did a few checks - non escaped! A soldier is seen here checking out a dead comrade. On the right is a worker.

A top-view of a soldier doing a scan of the area below.


Side view of the same soldier. This time it has decided that it is safe to make a down-hill trip from the original wood that it came from. The bottom-right object at the foreground is a grain of sand.


You can clearly see the fontanelle on the forehead of the soldier. A white latex-like droplet is often secreted from the fontanelle when challenged. An article from [https://taxo4254.wikispaces.com/Coptotermes+gestroi] mentions that the defensive secretion can represent up to almost 40% of the body weight!

The same soldier taking a long look.


A gathering of friends.


Two soldiers communicating with each other. What information could they be passing on?


Here, a soldier has a grain of sand stuck to its forehead, as a result of the defensive secretion earlier on. Notice the "glue-like" thing on its right pincer? The sticky stuff is supposed to act as a buffer zone between the soldiers and other attackers. Ants are their enemies and this sticky stuff will actually hold an unfortunate ant at bay while another soldier kills it off.


Finally, a sentinel standing guard.


Wednesday, 4 July 2018

American Cockroach - Once In A While

This evening an adult cockroach paid our home a visit. He was spotted flying into the boys' room by my daughter, and in a dramatic sort of way. You know, cockroaches don't fly nicely - they flap scarily all around, like trying to find someone's head to land. Very obviously, lots of screaming were heard.

Nevertheless, my elder son - who is currently serving in the NDU (Naval Diving Unit, Singapore) took care of it and presented me with the captured "periplaneta americana", an American cockroach. We do not get cockroaches often, either from the wild or internal-breeding as our home is well-kept by all of us.

Here are some shots of the insect that is widely considered as a pest, in all senses. Hope you will like it, at least the photos.


This particular, adventurous cockroach is about 45mm in length. I placed it in my photo-box that I made for insect photography (especially those that sneak into my home). Here, it is looking at me while I was adjusting my macro lens.


Although, it is considered as a pest, this cockroach certainly has a well-formed and neat body. A close-up view certainly gives us a better feel of its external structure. Just look at the lower segment of the neck! Like a set of goatee!


From the moment it was handed to me, this cockroach has never stopped cleaning itself. I observed that it can even clean its hind legs, up to the "thigh-joint". Now, that is a good show of flexibility, in spite of its longish body.


The cockroach is resting. Yes, it does that once in a while and then when it is done, it looks up and starts checking out the surrounding for a way to escape. After spending a few hours with him, it seems like we had become friends.

It is from here that we know this American cockroach is a male adult. Here you can see the presence of the cerci and styli. The cerci are the two longer (larger) appendages. The styli are the pair of smaller and delicate appendages appearing at the lower abdominal segment.

Friday, 29 June 2018

SUNDEWS - the carnivorous struggle

I was given a small pot of Drosera, also called common sundews, by my sister-in-law a few weeks ago. Sundew plants are carnivorous and so far this plant has trapped a few very tiny insects and made mince meat of them. One interesting fact from Wikipedia: They can achieve a lifespan of 50 years!

At other times, when too many milk ants invaded our kitchen, some of them would be thrown to this plant. But, this afternoon, something else happened.

A small spider, with length of about 2.0 mm from head to end of abdomen, accidentally touched the ever-reaching tentacles of these sundews. Garden spiders have been a good friend of mine as they prey on unwanted insects. Yes, my heart dropped. I spent a while observing how it is going to get itself out of hot soup.

It seems like its leg (1) and leg (2) have been glued into the tentacles. This is the first time that I actually see for myself how strong the sweet, sticky mucilage is. Tried as it did, the spider just could not pull its legs out of the stalked glands.

After a while of struggle, it takes a rest. Then it tries to turn outward and at the same time, pulls its legs. Nope, they are not coming out of the glue of death!


Here is looking at the situation from another angle. The spider has gone in a little bit forward, leading to a more precarious position than before.

Finally, with two legs trapped and the rest of its body outside, it just stopped. I believe it has expended all its energy and in due time it will die of starvation or exhaustion. Depending on what comes next, the sundews might just be able to lift the spider up and bring it deeper in for a fuller hold.

So, what I did was load a pair of tweezers with a small piece of tissue paper and use that to lift the spider up. Then I use another very damp tissue paper to dilute the sticky juice from the legs. Eventually, I put the spider down on a small cactus plant.

Did the spider make it? I think it did as a few minutes after I left it on the cactus plant, it disappeared. I certainly hope it makes it to its home, with all the limbs intact. 

By the way, I don't normally intervene in nature's progress. This one was an exception. Anyway, I was hoping for mosquitoes, fruit flies and the pesky milk ants.


Here is a picture of a fruit fly that met its doom. No way I could have saved this one. Truly a formidable organic "flypaper" trap.


Tuesday, 26 June 2018

New Birth - House Gecko from Changi Aviation Park

About 20 days ago, I was at my customer's premises at their work site office. A CCTV camera was down and we went over to see what the problem was. In the process, we did some clean up and as usual, the presence of house geckos (also known as house lizards) were plenty. Their droppings were present. And, they laid their eggs along the crevices of the false ceilings.

We cleared all of them, except for one that I brought home to monitor. Unfortunately, there were two days leading to today, that I did not monitor the egg. A baby gecko was born between this morning and two days ago.

Here are some photos I took. Do enjoy these sights of the baby house lizard!

House lizards are not cute, as far as my wife is concerned. But, this baby house lizard seems innocent and cute. Even then, it is a no-no to my wife. She won't want to touch it.


Here is the little one looking outside of the incubator, alongside its egg.

The egg is 8 mm by 9 mm in diameter. Its shell is hard and for a week after I got it back, I was wondering if the egg has even been fertilized at all! Fortunately, it turns out good.

Here is another angle of view between the baby house lizard and where it emerges from.


Here is a frontal shot. I looked at the underside of this house lizard and from what I get, it is a male gecko. So, it is a boy!

It is understood that house geckos are non-venomous and harmless to humans. The big ones are expected to bite if you handle them in a panicky manner - just like how they would chump on crickets and then proceed to swallow them whole. 

It was cleaning its face with its tongue, thus accounting for this open-mouth shot. Anyway, just look at the teeth of this baby.


Sunday, 24 June 2018

Backyard MACRO

Well, I actually do not have a backyard per se, since I stay in a government-subsidised HDB flat. However, there is a PCN (Park Connector Network) about 80 meters from where my flat is located. I do my jogging here, and if I could not find time travelling afar, this would be a good place to look for miniscure insects and bugs for macro photography.

The best time to photograph insects is the upper part of the morning. Being cooler, they are much slower in making an attempt to move away. Here are some specimens, including plants, that crossed my path this morning.

This stigma has some pollen on it (I hope I got this part of the flower anatomy right). Imagine a tube growing from these pollen into the base of the style, and eventually the male gametes (sperm cells) start travelling down to fertilize the ovary. The marvels of nature.


This weaver ant, together with many others are guarding their portion of the service road, where a few bright-yellow flowers are located. Obviously, they are up to something and I have to be careful not to step on them.


A close-up of one of the worker ants. This one with its abdomen up is definitely gearing for a fight. I think it spotted my lens and is all ready to protect its food source at all cost.

Another weaver worker ant on a dry leaf coming by.


These two ants are actually having a meal of pollen! It seems like these pollen are really sweet.


Yes. You guess it right. They are cutting up this petal and feasting on the sweetness of the petal, and the pollen of the flowers. It is really amazing to see their co-operative spirit in making sure there is food on the "table"!

A tiny snail on an equally small leaf. This snail is about 2.5mm across. It is just lazing about. Not moving much. Not tilting as well. Just staying still.


Close-up of a  yellow creeping daisy flower. This flower is about 15mm across its petals. The stamens are about to open up completely. I just love seeing the intricate design of flowers.


Another great-looking yellow creeping daisy flower that is ready for the fertilization process. Here, we can see the anthers, as compared to the picture above.


A close-up of a flower from among the grasses on the grown.


Lynx spiders like to hide underneath leaves. This one is just across from another one that is twice its size. It is about 10mm from head to tip of the tail. Lynx spiders are known for being good hunters.


This looks like a meadow spittlebug. I am just guessing as I did not want to disturb it just to have a better view. A real tiny fellow, though.


Spider on a dried leaf.


A blooming flower.


A resting Genus Gesonia moth. The ends of the wings look beaten up but it can fly off quickly!


Mushrooms growing from a cut-off tree trunk. This trunk is fully covered by the cow grass and is largely unseen, unless one spreads the grass aside. 


The under layer of a fallen bark.


A Hemigraphis reptans. Such a pleasant-looking little flower. It seems to stay low at the ground.


Close-up of a false daisy (Eclipta Prostrata) flower. It is a species of plants in the sunflower family.

A dead mite? Since it is lying in mid-air, it was probably trapped and killed by a spider. The tree moss is already so tiny, so I suppose the web is so fine that it was not picked up in this shot.


The seed of the false daisy (Eclipta Prostrata). It sure looks like a small version of the lotus flower seed. It is about 6 mm in diameter.


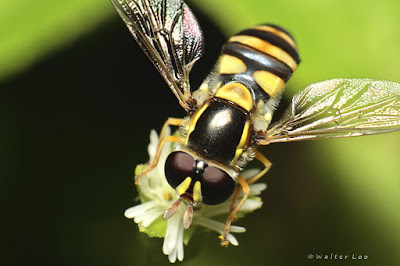
This hoverfly was flying from one flower to another. I waited for it to make a circle back to the nearest flower and took this shot. This fly is about 5mm long.

Found this black snail in the undergrowth of a bed of little plants. It is about 4mm across its shell.


It is morning now, so one can still see the left-overs of the early dew.


I like the pattern of this fallen leaf. This one is found in a perceptually wet grass-area. There are lots of large yellow-band millipedes. If ever my pet wants to change its diet, I know where to get them!


Another pattern that attracts me. A damp but dried leaf.


Looks like a bronzeback tree snake trying to swallow a bloated toad. As I surveyed closer, there were ants running around the toad, and it was bloated up. A bronzeback is a non-venomous snake.