Catching Up With My Kossel Pulley
I realized that I have not been doing any update on my macro photography stuff for quite a while! In the first place, I should not have used "Macro-Passion". Maybe, "Anything Can" is a better blog name so that I can write whatever topic I want.
In fact, this time round I would like to touch on some of my experiences on the 3D Anycubic Kossel Pulley printer that I bought in 2017.
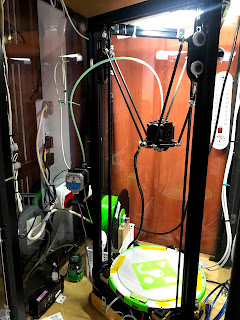
Here is a picture of the lanky printer. That green ABS filament spool you see on the left was bought at the same time as the printer. For a long while, I did not "humid-protect" it and hope that it will last well.
This affordable printer is a gem, considering that it is totally upgradable - which I did not do much on, until last week or so. I did change some wheels though and created a bearing-supported filament holder for the poor reel. I never regretted buying this printer.
Past two days, I was trying to move away from the 2018 .hex firmware that Anycubic support provides as a download. This firmware allows users to perform auto-levelling with a sensor probe. I have been using this version for about two years, on and off. But, I needed to make some changes at the source level. Too bad.
Auto Calibration - Marlin 1.1.9
So, I decided to search the trusty YouTube (again) and found Chris Ridley's video. It was easy to follow and I managed to download the firmware, change some parameters and perform the firmware upgrade. You can check out Chris', Delta Auto Calibration - Marlin 1.1.9 - Chris's Basement video here.
Yes. In short, it worked and I successfully got the Kossel Pulley's firmware upgraded. More on this exciting process below.
Some Confusing Actions
As for the downloading of the Marlin 1.1.9, I tried three versions, including the 1.1.x "bugfix" snapshot, because someone pointed out that this BUGFIX fixes all the errors and adjusts some parameters.
For all three versions, I encountered the same "endstop" error - where the home position is about 46mm below the actual home position.
Finally, I contacted Chris at his YouTube comment and surprisingly, got an answer within the hour. Well, you could say, minutes! I just needed to disable DELTA_HOME_TO_SAFE_ZONE. Yes. Just that and it worked.
Selecting The Right Version of Marlin
Eventually, I decided to use the BUGFIX version as I read that it resolves a few important issues. You may check this page that shows the differences between the version 1.1.x and bugfix-1.1.x (or try other comparisons) ==> https://github.com/MarlinFirmware/Marlin/compare/bugfix-1.1.x...1.1.x
Some slight differences are listed below:
1. Someone says this, "The main difference I found is that 1.1.9 apparently has the hom speed settings too high. The config from 1.1-bugfix has corrected values. Also the bed size is corrected". This comment can be found here, https://www.reddit.com/r/ender3/comments/agolqg/which_version_of_marlin_to_flash_119_or_bugfix_11x/
2. This portion of codes is different from Chris' screen shot and I suspect that it is okay to let it be as it seems to have what Chris has suggested.
// Mechanical endstop with COM to ground and NC to Signal uses "false" here (most common setup).
#define X_MIN_ENDSTOP_INVERTING false // set to true to invert the logic of the endstop.
#define Y_MIN_ENDSTOP_INVERTING false // set to true to invert the logic of the endstop.
#define Z_MIN_ENDSTOP_INVERTING (ANYCUBIC_PROBE_VERSION + 0 == 1) // V1 is NO, V2 is NC
#define X_MAX_ENDSTOP_INVERTING false // set to true to invert the logic of the endstop.
#define Y_MAX_ENDSTOP_INVERTING false // set to true to invert the logic of the endstop.
#define Z_MAX_ENDSTOP_INVERTING false // set to true to invert the logic of the endstop.
#define Z_MIN_PROBE_ENDSTOP_INVERTING Z_MIN_ENDSTOP_INVERTING
3, As I needed a 110C heated bed for my ABS printing, I added (+20C) to the existing Bed_Maxtemp field so that I can input or select 110C later on at the printer's LCD. If this is not set, the most you can get is 105C ==> #define BED_MAXTEMP 130
4. I made this change for Pre-Heat menu: #define PREHEAT_2_TEMP_BED 110
Did It Work this Time?
I made all the changes as per Chris' video, and uploaded the BUGFIX 1.1.x into the Kossel. Also, Chris' mentioning of doing M502 and then a M500 from the Prontoface is good cautiousness which I appreciated.
The >Delta Calibration >Auto Calibration works fine. I did it on a clean non-heated glass bed. This glass bed sits on top of the aluminum plate. The total number of iterations was [11]! A staggering 11! So, it really took a while of coffee-drinking to wait it out.
Pre-Check of Parameter Values via LCD:
Height level: >Prepare >Delta Calibration >Delta Settings, and the height is +313.00
Z-Offset: >Control >Motion > Probe Z Offset and the height is -17.15
Making Adjustment to the calibrated figures:
I checked, and found the nozzle at bed level is at +0.50.
- This was done via Prepare >Move Axis >Move Z >Move 10mm & 1mm & 0.1mm
My Cura layer height setting for almost all print was +0.20, so I decided to go for a +0.10 adjustment.
Therefore, -17.15 less (0.50 and 0.10) = -16.55
Switched back to Marlin, Configuration.h and adjusted the Z-Probe_Offset_From_Extruder from -17.15 to -16.55
Uploaded the changes back into the Kossel.
Did a M502 and M500 with Prontoface.
Heated up the bed to 110C and did a simple first print.
The result?
Thank you, Chris Riley!
AFTERNOTES
1. FINALLY: As always, any time you load in new firmware, always do the following:
2. Control
3. Initialize EEPROM
4. Restore Failsafe (or Load Factory Setting)
5. Store Settings
6. Reboot the printer (Power off / Power on)
Permanent Link: https://macro-passion.blogspot.com/2020/09/catching-up-with-my-3d-printer-i.html


